Temari glossary and stitch directory
As your temari stitching skills grow, so will your temari vocabulary.
The language of temari is very easy to learn. Many of the words compare
directly to words we use when talking about our Earth - north pole, south
pole, and equator, for example.
When the direct translation of a Japanese temari term is awkward or long,
an easier English term is given. Otherwise, every effort has been made
to follow the centuries-old tradition of temari in Japan by using translations
which match the original Japanese as closely as possible. When I needed
clarification, I consulted Sensei Ozaki at the Japan Temari Association in Tokyo on translations
of terms from Japanese into English. I was encouraged to simply
use words that we can all understand.
Download a pdf interactive copy of the glossary
Enjoy!
Barb
Contents
All-over design |
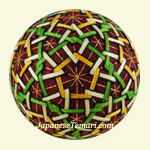
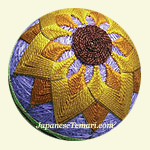
Ribbed kiku herringbone (sujidagiku) |
Simple division (tanjyun toubun) |
All-over design -
A design where the stitching covers the entire temari ball and none of
the thread wrap shows.
Basket design -Design created by wrapping thread all the way around the temari.
Bottled temari (bin temari) - Like a ship in a bottle,
once the temari is inside, it won't come out! What’s the secret? Construct your temari ball with a core that can be removed (a thick slippery cord), stitch the design, remove the cord, collapse the stitched ball, slip it into the bottle, and re-stuff the core with cotton or batting through the opening of the bottle.
Box weaving (see Weaving)
Braided kiku herringbone stitching - see ribbed kiku herringbone
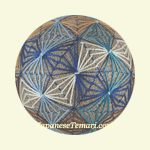
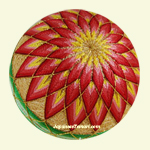
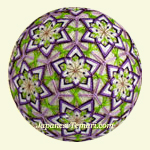
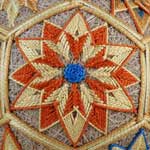
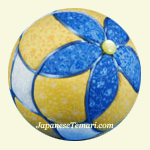
Chrysanthemum (kiku) -
Kiku is pronounced “kee
koo.” This is a very popular design in temari and can be stitched
in a variety of ways. The design spreads outwards from the center to resemble
the multi-layered chrysanthemum flower and can be made with a number of
different stitches. The designs in the two drawings below use the kiku herringbone stitch.
These are very common temari designs used to represent the chrysanthemum.
They are called the 8-layered kiku and 16-layered kiku.

Combination division (kumiawase)
A temari is first marked in a simple division with north and south poles. Then more guidelines are added to create a C6, C8, or a C10 division.
Combination 6 division - The simplest way to mark a C6 is to mark
a C8 division and leave off some of the guidelines. You end up with large
triangles. These are filled with tri-wing stitching in the photo below. The C6 is such a pleasing, symmetrical division - perfect for designs with four equally spaced centers.
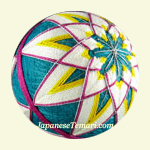
Combination 8 division (C8) (hachitobun no kumiawase) -
Begin with a simple 8 division ball (with a north pole, south pole, and
8 pins around the equator). Add extra guidelines on the diagonals. Also
called 8 combination, complex 8, compound 8 or double eighths mark. In
the drawings below, the long lines of each shape are solid. The short lines
are dotted. Use these diagrams to find the squares on a C8, the diamonds on a C8, and the triangles on a C8.
Combination 10 division (C10) (jutobun no kumiawase) -
Begin with a simple 10-division temari (with a north pole, south pole,
and 10 pins around the equator). Add extra guidelines to end up with 12
centers equally spaced around the ball. Also called a complex 10-division,
compound 10 or a pentagons mark. In the drawings below, the long lines
of each shape are solid. The short lines are the dotted lines. Use these drawings to find the pentagons on a C10, the diamonds on a C10, and the triangles on a C10.
Continuous paths stitching (renzoku kagari) - A more advanced
technique of stitching where you stitch a path through several points and
end up where you began to complete part of a design. Stitch through more
paths to complete the entire design.
Continuous
motif - HHG (hito hude gake) - “One stroke
design”
This name comes from the technique of writing a kanji character in one stroke from beginning to end, where your pen does not leave the paper and you end up back at the starting point. A complete design is formed with one stroke. Examples in temari are the 5-point star, triwing (trefoil), and a design formed by following one path through several shapes on the ball to fill in all those shapes. A classic hhg design covers the entire ball with one stitching path from north pole to south pole and back.
Core - The middle area of the temari under the thread
and yarn layers.
Descending herringbone (shitagake chidori kagari) - Stitch rows of herringbone stitches close together but not overlapping.
Make your stitches small to form points. Direct translation of shitagake
chidori kagari is “below, beneath or under arrangement of up and down like
the little bird stitching.” See herringbone stitching for the basic
technique.

Ending stitch - To end off, stitch away under the thread
wrap a short distance. Come up and clip off thread close to surface of
ball. Also called “escape the thread” or “exit the thread.”
Equator (sekido) - Just like the equator of the Earth,
the equator of a temari is a line around the fullest part of the ball (the
circumference) between the north and south poles.
Guidelines (jiwari - After placing pins at the north pole, south pole and around the equator,
a guideline thread is wrapped around the ball next to these pins. Tack
the intersections in place, then use these threads as guides when stitching
the temari design. Guidelines are also called “marking threads.”
Guide pins - Pins placed in the ball at the poles and
around the equator to serve as guides when adding guidelines to the ball
or when stitching the design.
Herringbone stitching (chidori kagari) - This stitch makes a fascinating, kaleidoscopic design, circling the ball
and drawing our eyes into the center and out again following the layers of
color. It can also be stitched over a band of threads (like an obi around
the equator) for decoration and to hold them in place. Direct translation
of chidori kagari is “up and down like the little plover bird stitching.” To
form the points you so often see in temari, keep the backstitch part of
the stitch (for example, from 4 to 5 in the below drawing) small so a point
is formed.
Single herringbone
To form a flower, stitch a herringbone closer to the pole. Here is a 4-petal flower formed by stitching one row herringbone stitch around the ball on a simple 8-division:
Double herringbone
Stitch two times around the temari with a herringbone stitch with the points reflected. Use to secure a thread wrapped obi.
Herringbone variations
See ribbed kiku herringbone, descending herringbone, kiku herringbone, and reverse kiku herringbone. These are listed separately.
HHG (hito hude gake) - “One stroke
design”
See continuous motif. In this classic hhg design, you begin at the north pole, stitch a continuous line spiraling around the ball to the south pole, turn around, and stitch your way back to the north pole.
Hexagonal weaving - see Weaving
Interlocked stitching (nejiri kagari)
A design in which one shape is stitched completely and then, a second shape is stitched so that it weaves in and out of the first shape. Or you can interlock a continuous motif by weaving between stitches within the motif. Direct translation of nejiri kagari from Japanese is “interlocking or twisted stitching.”

Kiku design- see Chrysanthemum design
Kiku herringbone stitching (uwagake chidori kagari) -
Begin by stitching one row using a herringbone stitch (see herringbone
stitching). For each row after that, on the inside points stitch under
and around all previous rows. For the outside points, place stitches just
below the previous row, without any weaving. Direct translation of uwagake
chidori kagari from Japanese into English is “upper-hooked arrangement
of up and down like the little plover bird stitching.”
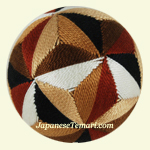
Layered stitching (kousa kagari)
A design made by building up layers by alternating stitching between different shapes. For instance, to make a layered triangles design, stitch first around one triangle (1 row), then around another triangle (1 row). Continue alternating between the two triangles (stitching one or more rows at a time), making them larger and larger as you stitch. When making a continuous motif that is layered, simply add more rows to the outside, laying thread on top of previous rows where they cross in the middle of the motif. Also, translated from Japanese as “crossed” design.
Making a temari ball - There are many different ways to make a temari ball. Experiment to find your favorite.
Marking strip - A piece of paper about 1/4 inch wide and long enough to go around the ball with a little extra. It is used to divide the ball into sections and place guide pins on the ball.
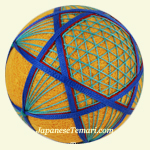
Merry-go-round
stitching (jyouge douji kagari) - A continuous path stitching design that travels around the whole temari.
Stitch in the northern hemisphere, lay the thread across the equator, and
stitch in the southern hemisphere. Lay the thread across the equator and
stitch in the northern hemisphere. Repeat until you reach your starting
point. The stitches can be herringbone or any variation so long as they
travel over the equator between stitches. Direct translation of jyouge
douji kagari is “up
and down at the same time stitching.” The English name of this term comes from Vandervoort's design.

Mitsubishi - see Three diamonds
Multicenters marking -
First divide the ball into a combination division. THEN divide it even
more. Also known as multipole.
Net stitching (amime-giku) - Use a herringbone stitch to create the illusion of a net.

North pole (hokkyoku) - The center at the top of
the ball. Place the first guide pin anywhere in the ball, and you have
found your north pole.
Obi stitching (obi kagari) - Herringbone
stitching placed over the obi to hold it in place. Gold metallic thread is
used for the double herringbone stitched over this wide obi.
Octagonal weaving - see Weaving
Overlapped stitching - Stitch one shape completely. Then stitch another
shape and lay all threads on top.
Paper marking strip – See Marking Strip
Pine
needle stitching (matsuba kagari) - Fill
an open space by stitching a group of evenly spaced straight stitches,
crossing through the center. Or add partial designs to create interesting designs.
Power wrapping - To quickly cover the
yarn wrap with thread, wrap using several spools or cones of thread at
once. When the yarn layer is no longer visible, switch to a single thread
to give stitching surface a fine finish.
Reverse kiku herringbone (sakasa uwagake chidori) - Reflect
the stitches. The inside points are “V” shape and the outside
points are stitched under and around previous rows. “Sakasa” means
reverse.
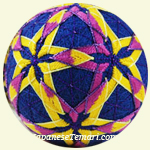
Ribbed kiku herringbone (sujidagiku kagari) - The inside points are stitched a bit differently. Instead of stitching under and around ALL previous rows, stitch under and around only a selected number. In the photo below, you stitch under and around only one row. There are other variations of the same technique.
Simple division - A ball marked with a north pole and south pole and then divided into sections vertically (like an orange).
Single herringbone - see herringbone
South pole
(nankyoku) - The
bottom center of the ball, directly opposite the north pole. The distance
between the north and south pole is half the circumference of the ball.
It is also half the length of the paper marking strip.
Spindle stitching
(tsumu kagari) - A
design stitched around 2 pins. It has an oval shape.

Square stitching (masu kagari) - Stitch around four points
to form a square.
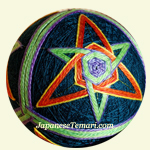
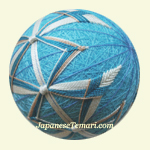
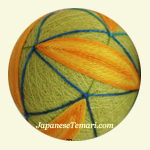
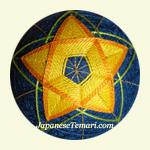
Star-5 pointed (hoshi kagari) – Stitch
on five guidelines for the five points of the star. This is a continuous motif.
Starburst - see pine needle stitch
Starting stitch– Stick
the needle, with thread knotted, into thread wrap, about two inches away
from the starting point. Come up at the starting point and tug on the thread
until the knot pops down into the thread wrap. Some temari stitchers prefer
not to knot their starting stitch.
Swirl stitching (uzumaki
kagari) - Fill stitch that does not need guidelines.
Stitch around the border of the shape and work towards the center.

Tacking stitch - A
small, inconspicuous, deep stitch made around guidelines or other threads
to hold them in place.
Temari– Japanese word for handball. Temari are thread-wrapped balls that are embroidered. Another style is made with a kimekomi technique where fabric is tucked into grooves carved into a polystyrene ball.
Thread wrap - The final wrap
of sewing thread. It is a background for the stitched design.
Three diamonds (mitsubishi) - A design of three diamonds with their points meeting in the center. There
are several different ways to create this layered design.
Trefoil - see triwing
Triaxial weaving - see Weaving
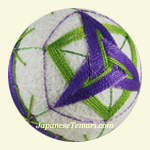
Triwing (mitsubane kikkou
kagari) - Also
called trefoil (pronounced “tree-foil” in English). A triwing
design may be familiar to you from Celtic art. It is stitched on three
division lines but it’s easier to mark a 6-division temari.
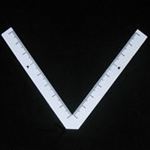
V-Ruler - Small plastic ruler in the shape of a “V” supplied
by the Japan Temari Association in Tokyo.
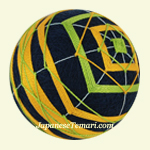
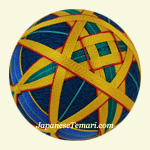
Weaving (ami) - You can use techniques for weaving baskets
to add fill to temari shapes. The Japanese are masters of weaving from
centuries ago. The name of the weaving design is based on the shape of
the hole or eye (me translates as eye) created by the crossed threads.
Box weaving (yotsume) - Threads cross from two directions.
Hexagonal weaving (mutsume) - Threads cross from three
directions and interweave.
Octagonal weaving (yatsume) - Weave thread in vertical
and hortizonal directions. Then weave more threads diagonally.
This design is common in caned chair seats as well as basketry.
Woven pattern - Weave through a previously stitched shape between stitches. Do more than just interlock - stitch one shape completely and then weave over and under individual threads to create a more intricate design. Patterns found in woven fabrics, bead weaving, or even chair caning can be recreated on temari.
Wrapped Bands (maki kagari) -
Wrap design threads around the ball, usually next to a guideline to create
bands of color.
Yarn wrap - Wrap soft yarn around the core to make
a good base for stitching.