Mitsubishi Stars

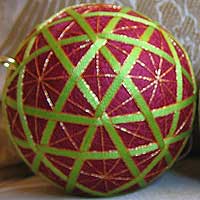
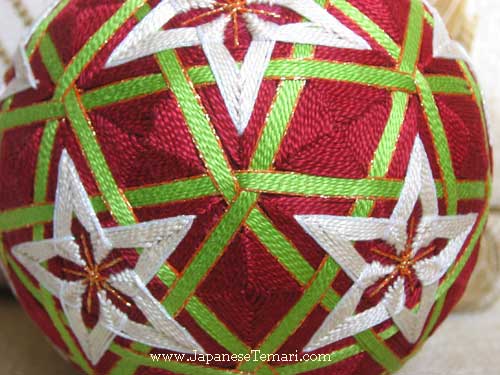
This is an advanced temari design that presents an intriguing puzzle of shapes. Three red diamonds form the "mitsubishi" pattern in the background. Cream colored stars surround red 5-petal flowers.
After you have figured out placement for the green wrapped bands, the rest of the stitching is not hard; in fact, it is quite relaxing. The design is called an 'all-over' design because when you are finished, the stitching will entirely cover the ball. Well, except for the little bit of thread wrap showing inside each cream colored star.
Supplies
41.5 cm circumference ball wrapped in dark red thread and marked in a combination 10-division.
Thread for marking and outlining the green wraps: Ricky Tim's Razzle Dazzle #WB21R271 (mango tango)
Thread for stitching:
Anchor#5 perle cotton
#255 ( green),
#387 (cream, dark),
#44 (carmine rose, dark) *Note - purchase 2 skeins of each color
Kreinik medium (#16) braid 032 used to outline the stars
Step 1
Place a blue pin in the center of each 6-part triangle on the ball. With the same thread used to mark the ball, come up next to a blue pin and complete one wrap of the ball as shown in green below. It is important to wrap to the outside of each blue pin (relative to the center of the pentagon). Then wrap 5 rows with green perle cotton and one row with the metallic marking thread.
Each wrapped band is made up of 5 rows of green perle cotton surrounded by one row of metallic on each side.
Step 2
For all the remaining wrapped bands, you will wrap the same band of 1 row metallic thread, then 5 rows green perle cotton and then 1 row metallic thread. Each time you begin a new wrapped band, come up under any previous band so the starts and stops don't show.
When you come to an intersection and you need to decide whether to wrap over or stitch under a previous band of thread, follow this rule: look at the intersection with the wide sides oriented to top and bottom. Position the new band so the band on top runs from top left to bottom right.
Note that on this particular pattern, not all of the wraps to complete a 32 multi-centered ball are done. So, even though all of the intersections look like the drawing above, when you follow one wrap around the finished ball, it does not always go under then over then under then over (etc!) the crossing wraps. If you added more wraps to complete the 32 multi-centered division, you would see this over/under pattern.
When 3 wrapped bands intersect in the center of a 6-part triangle, the crossings will look like this:
Second wrap:
Step 3
Third wrap
Step 4
Fourth wrap
Step 5
Fifth wrap
Step 6
Complete all the wraps on the rest of the ball. (Please excuse the out-of-focus picture!!)
Step 7
Next you will stitch a 5-petal kiku herringbone design inside each 10-part pentagon on the ball. Use Anchor #387 (dark cream). The inside points are close to the center of the 10-part pentagon. The outside points are just over the band of green wraps.
Step 8
Continue stitching the 5-petal kiku herringbone. Stitch 5 rows with dark cream colored perle cotton.
Then stitch 1 row with Kreinik medium (#16) braid 032. This completes the kiku herringbone star. Stitch the same star in each of the twelve 10-part pentagons on the ball.
Step 9
With dark red thread, fill in each of the 4-part diamonds on the ball. Begin in the center of the diamond and work outwards until you reach the green bands.
Step 10
The last step is to use the dark red perle cotton thread to fill in the area around each cream colored star. Stitch a 5-point star with red and in between stitches, run the red thread under the green bands and the legs of the cream colored star.
First row stitching around the red star:
Second row stitching around the red star:
Third row stitching around the red star:
Fourth row stitching around the red star:
Fifth row stitching around the red star:
Continue stitching the red star and weaving UNDER green bands and cream-colored star until the area is completely filled. This will be 3-5 rows, depending on the size of your ball and the size of your cream-colored stars.
Complete the same red stitching around each cream-colored star on the ball. You are done!